To add a new simple product to your product catalog, follow these simple steps.
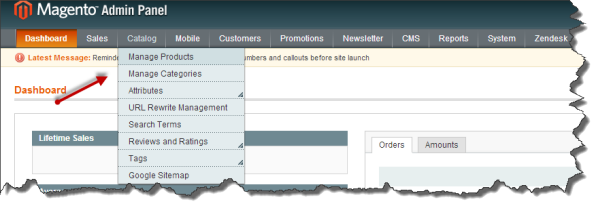
Go to Catalog –> Manage Products
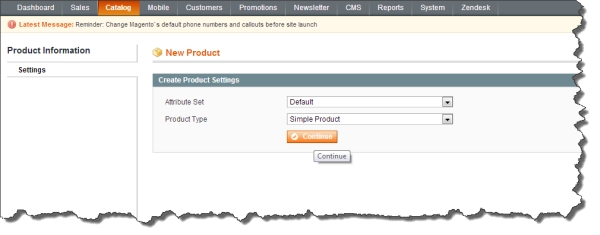
Click the Add Product button

The Attribute Set should be "Default" and the Product Type is "Simple Product". Click Continue
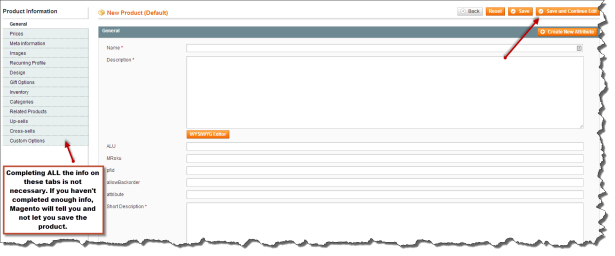
Now you are ready to begin creating your new product. There are a series of tabs on the left hand side of the screen. They start with General and end with Custom Options. There are required fields in each of these tabs that must be completed in order for the product to be saved and ultimately be live on the site. These required fields are marked with a red asterisk. Click "save and continue edit" when you are finished with each tab. It will save all your info and take you to next tab.
**NOTE: If your products are coming via an integration, some of these fields will be completed with info from your POS system. You will have to do some editing, however, before the product should be made live on the site
Some hints for completing the General Tab are below
- Description Field: This is where you type a few short sentences describing your product. These sentences are what will appear in the search engines for your product.
- Short Description Field: This is a great area for a bulleted list of info you would like customers to know about the product. It can be fabric care, materials, Made in the USA, etc.
- Make sure to set the status to "enabled" and the visibility to "catalog, search" so that your product will appear on the site. The visibility should be the last thing you change. Once you set this to “Catalog, Search”, your product will appear on the site. We recommend that you do not set this field until you have proofed the entire product and are ready to make it live. {The only exception to this rule is if the simple product is part of a configurable product and not a stand alone product. If it is part of a configurable product, leave this field set to “Not Visible Individually”.}
Prices tab, make sure you enter the price and set the Tax Class to "taxable goods", unless your product is tax exempt!
The Meta Information tab is used for SEO purposes and will be automatically completed for configurable products. You can complete for simple products.
Upload the image for your product to the Images Tab. There are three different types of images and you have the flexibility to choose which image you want for each image type. The three image types are:
- Base image – shows up as the default for product
- Small image – appears on the category page
- Thumbnail – appears in shopping bag
On the Inventory Tab, double check your quantity to make sure it is accurate. Also, the Stock Availability should be set to "In Stock" if you do have inventory for this product. If this is set to "Out of Stock", your product will not appear on the site regardless of what your quantity number is. The Stock Availability should automatically update based on the value in the Qty field, but it is always good to double check!
On the Categories Tab, check the box next to the categories you want this product to appear in on the site. You can select as many as you like. If adding a product to a subcategory, make sure you check all the categories above it or it will not show up on the site.
These basic steps will get your product live on the site. For more in-depth info on, see these related Help Pages