Overview
New POS Products is a staging area where all the data from your point of sale systems “lives” until you make it an active product in your catalog. This data includes price, inventory information (Quantity on Hand), descriptions, POS item numbers and/or UPC numbers.
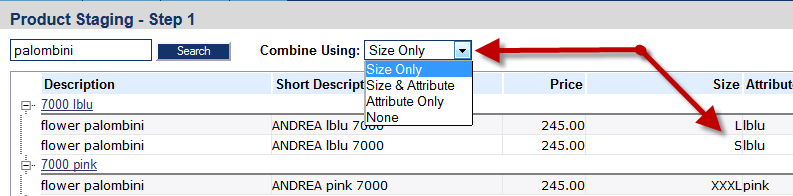
Searching for an Item
When searching for an item, you can search by style number, brand, product name, UPC or even price. The more specific you are with your search criteria, the better your search results will be. Modern Retail recommends you search by style number or SKU for the best results.
Options (Combine Using Menu)
You can combine or manipulate the options a product will have on the New POS Products page using the “Combine Using” dropdown to the right of the search field. The options include:
- None
- Size
- Attribute
- Size and Attribute
Typically, apparel and shoes will use the combine using " size" option. Items that are come in multiple colors may use the “size and attribute” option. For example, you are working with a tank top that comes in 10 colors. Rather than make each color it’s own product, you can combine by size and attribute and have all the colors grouped under one product. How you combine products determines the drop down options for the shopper on the product page.
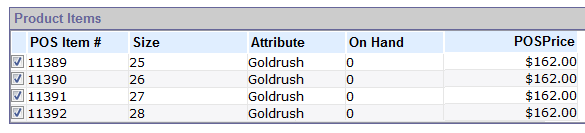
Integration Information Table
In the next phase of working with your product you will use the table on the page that has all the integration data (Price, QOH, PC’s, etc.). For apparel and shoes, you should see multiple items listed; the sizes and/or the colors, the price, item number and quantity on hand. If you’re adding a shoe or apparel item and only see one size listed, STOP and review your work. More than likely the drop down on the New POS Products page was set to none and the rest of the sizes for that item are still in staging and will not be added to the product. At this point in the process, you can cancel your work, return to the New POS Products page and start over.
You can also exclude an item from being added to the catalog. For example, a shoe might be unisex shoe and come in a size range that reflects both men’s and women’s sizes. In this example, you may want to “split out” the men’s sizes and make them a separate product. Simply uncheck the sizes that should not be part of this product. When you hit “save”, those items that were unchecked will be returned to staging (New POS Products) and can be created as a separate product.
Editing A Product
Once a product has been created, you can still add additional items to the product. Follow these steps:
- Find the product in the catalog, go to Edit Options.
- At the bottom of the page, under the integration information table, click “Show POS”. The search field will be automatically filled with the product name of the product you’re working in. (You may need to “tweak” this info for accurate results.)
- Click “search”.
- You’ll see a list of options to add to this product. Just as on the New POS Products page, you can combine by size, attribute or both.
- Check the options that you’d like to add to this product.
- Scroll to the top of the page and hit “Save”.
For this scenario, please save the added options before going back into the product to edit the Product Options labels.